
This post may contain affiliate links which means I may receive a commission for purchases made through links. I only recommend products that I have personally used. As an Amazon Associate I earn from qualifying purchases. Learn more on my Private Policy page.

Harvesting sage is easy when you know the right techniques. By following proper harvesting methods, you can ensure that your sage plants remain healthy and undamaged.
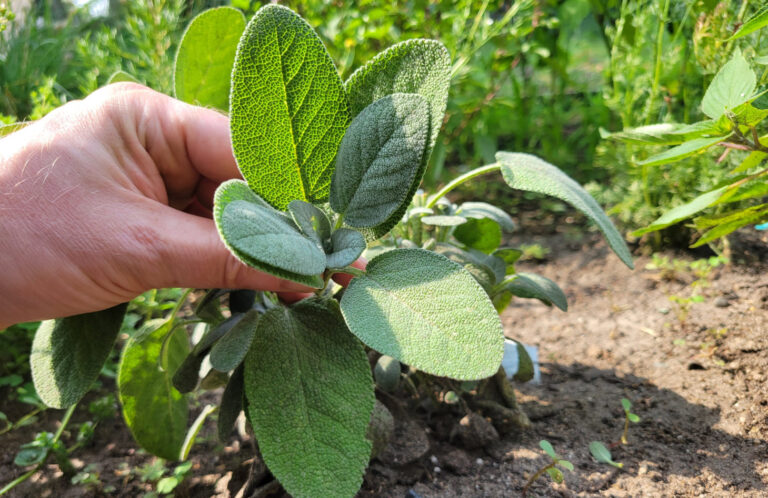
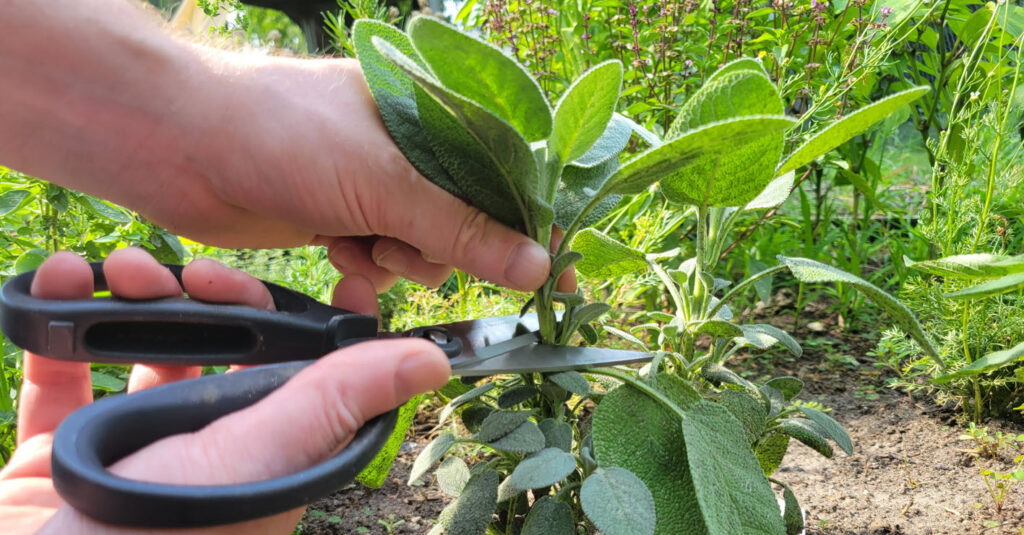
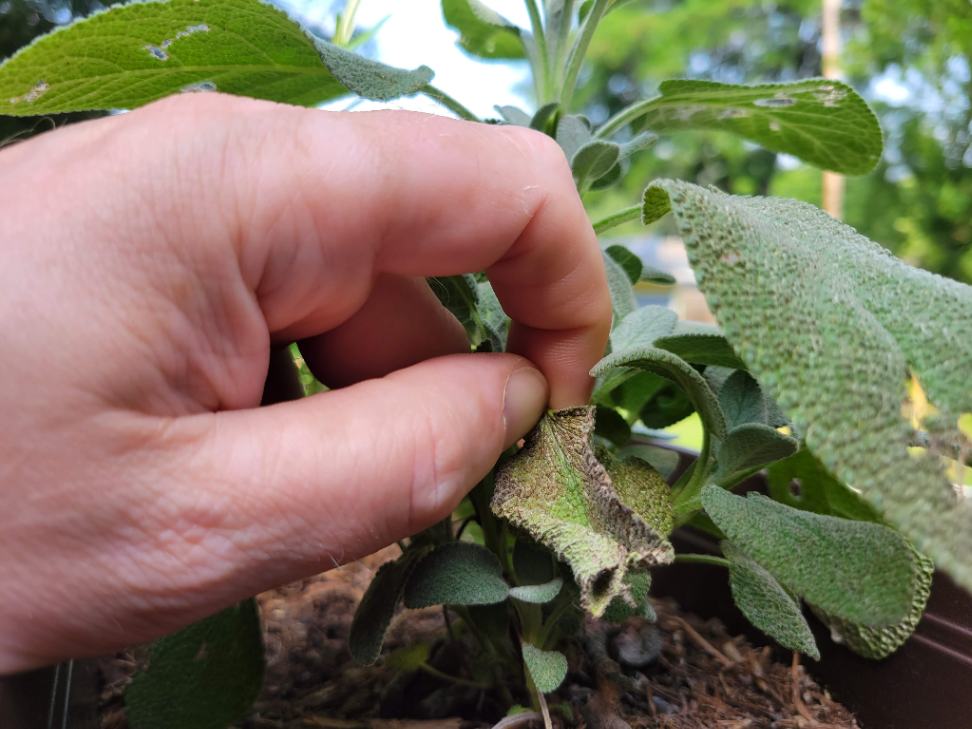
To harvest sage, wait until it’s well-established. Use clean shears to snip leaves or stems, about 4-6 inches from the tip. Harvest before flowering for the best flavor, and remove damaged leaves to maintain plant health. Never harvest more than 1/3 of the plant at a time for continued plant growth.
In addition to knowing how to harvest sage, it’s also important to know when to harvest sage.
The best time to harvest sage is during its pre-flowering stage in late spring or early summer. During this phase, sage has a higher concentration of essential oils, ensuring a robust flavor and aroma. Always opt for picking sage leaves from well-established plants when you harvest.
Once you’ve harvested your sage, what is the best way to preserve it for optimal flavor?
Generally speaking, air drying is the recommended method for preserving sage to maintain its rich aroma and flavor. To air-dry sage, hang it upside down in bundles for two weeks in a cool, well-ventilated area until dry. Once dried, remove the leaves and store them in sealed containers.
Table of Contents
Sage Harvesting Timing and Techniques
Sage, also known as Salvia officinalis, is a popular perennial herb that is widely used in cooking. It’s no wonder that many people are interested in harvesting sage from their own gardens.
Establishing the Sage Plant
Sage plants can be harvested throughout the growing season, but it’s best to wait until after the plant has established itself before harvesting. This allows the plant to develop a robust root system and ensures its long-term health. Once your sage is well-established, you can start harvesting its flavorful leaves.
Sage Harvesting Methods
To harvest sage, use a pair of clean garden shears and snip off the leaves or stems. For smaller amounts, individual leaves can be snipped off close to the stem using sharp scissors or pruners. If you need larger quantities of sage, cutting full stems with multiple leaves attached is more efficient. Cut sage roughly 4 to 6 inches from the tip of the stem.
Harvest Sage Before It Flowers
Harvest sage before the plant flowers to maintain the herb’s optimal flavor and aroma. The leaves of sage contain the highest concentration of essential oils before the plant starts flowering, and it is these oils that contribute to the distinct taste and fragrance of sage. By harvesting before flowering, you ensure that the leaves have the most potent flavor profile, making them ideal for culinary purposes.
Harvesting Sage Without Harming the Plant
Sage can be harvested sustainably by following proper techniques that avoid harming the plant’s overall health. By adopting careful harvesting practices, you can ensure the continued well-being of your sage plants.
Removing Damaged or Diseased Sage Leaves
While harvesting, it’s important to remove any damaged or diseased leaves to maintain the overall health of the plant. This helps prevent the potential spread of diseases and pests among your sage plants. By keeping an eye out for any signs of damage while harvesting, you ensure that only healthy leaves are collected.
Avoid Overharvesting Sage
When harvesting sage, never harvest more than one-third of the plant at a time. Overharvesting can weaken the plant and hinder its ability to regrow properly. To ensure continued growth and future harvests, always leave enough foliage on each branch for photosynthesis and energy production.
Harvesting from Young Sage Plants
Harvesting young plants requires extra care as they are still establishing themselves. It’s advisable to wait until sage has reached maturity before starting regular harvests. This allows the young plants to develop a strong foundation, ensuring their long-term survival and productivity.
Sage leaves are best harvested when they are green and vibrant. Avoid harvesting wilted or discolored leaves as they may not have the same intense flavor. By selecting healthy, green leaves, you guarantee a more aromatic and flavorful harvest.
How to Store and Preserve Fresh Sage
After harvesting sage, it’s important to store and preserve it properly to maintain its freshness and flavor. Here are some simple methods you can use to store your fresh sage for extended periods:
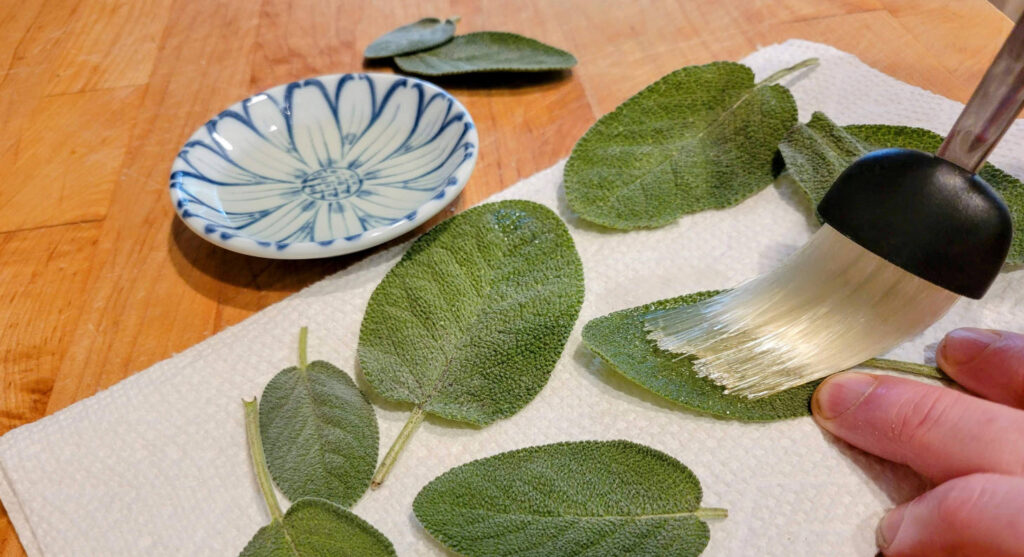
Rinse and Dry Before Storage
Start by rinsing your freshly harvested sage leaves under cold water to remove any dirt or debris. Gently pat them dry with a paper towel, being careful not to bruise or damage the delicate leaves. This step ensures that your sage is clean and ready for storage.
Refrigerate with Paper Towels
If you just need to keep your sage fresh for a few days, wrap the leaves in paper towels before placing them in a plastic bag or an airtight container. This method helps absorb excess moisture. You can store the wrapped sage in the refrigerator this way for up to 4-5 days.
Coat with Olive Oil
For longer-term storage of fresh sage, an effective method is coating the leaves with olive oil. Dip each leaf into olive oil or brush them lightly with a thin layer of oil using a pastry brush. This coating helps prevent wilting and preserves the herb’s natural oils and flavors. Afterward, place the oiled leaves in an airtight container or jar and refrigerate for up to 3 weeks.
Freeze for Longevity
Freezing is another excellent option for preserving fresh sage leaves for an extended period, allowing you to enjoy their flavors even when they are out of season. To freeze fresh sage, begin by removing the stems from each leaf as they tend to become tough when frozen. Then pack the individual leaves loosely into freezer bags, ensuring there is enough space between them so they don’t stick together. Label the bags with dates before placing them in the freezer where they can be stored for up to one year.
Additional Preservation Methods
Apart from refrigeration and freezing, there are other creative ways to preserve sage for later use. Here are a couple of additional methods you can explore:
- Sage Salts: Combine fresh sage leaves with coarse salt in a blender or food processor until well mixed. Transfer the mixture to an airtight container and store it in a cool, dry place. Sage salts add a delightful flavor to various dishes and can be stored for several months.
- Sage Oils: Infuse olive oil or another neutral oil with fresh sage leaves to create flavorful sage oils. Simply heat the oil gently on low temperature in a saucepan, add the sage leaves, and let them steep for about 30 minutes. Remove the leaves and transfer the infused oil into sterilized bottles or jars. Store in a cool, dark place for up to several months.
Remember to experiment with different preservation techniques to find what works best for you and your cooking preferences.
How to Dry Sage
Drying sage is a simple and effective way to preserve its flavor and aroma for future use. Drying can extend the shelf life of your garden sage and ensure that you always have this versatile herb on hand.

Air-Drying Sage
Air-drying sage is the traditional method that has been used for centuries to preserve herbs. It requires minimal equipment and allows the sage to dry naturally, maintaining its essential oils and flavors. To air dry sage:
- Gather several stems of fresh sage together.
- Use twine or rubber bands to tie the stems into small bundles.
- Ensure that each bundle is secure but not too tightly bound.
- Find a cool, well-ventilated area away from direct sunlight.
- Hang the sage bundles upside down in this location.
By hanging the bundles upside down, you allow gravity to help with the drying process while preventing any moisture from accumulating within the leaves. The cool environment helps retain the herb’s potency while proper ventilation prevents mold or mildew growth.
Leave the sage undisturbed for approximately two weeks until it becomes brittle when touched. Once dried, remove the leaves from their stems by running your fingers along each stem in a downward motion.
Drying Sage with a Food Dehydrator
If you’re short on time or prefer a quicker drying process, using a food dehydrator is an excellent option. This method allows for precise temperature control and faster drying times:
- Remove the sage leaves from their stems.
- Arrange the leaves in a single layer on the dehydrator trays.
- Set the temperature to around 95°F (35°C) and turn on the dehydrator.
- Check periodically until the sage leaves are dry and crumbly.
Using a food dehydrator can significantly reduce drying time, typically taking only a few hours compared to weeks with other methods.

Check out my article about how to dry woody herbs like oregano, thyme, sage, and rosemary for additional drying tips and techniques, and to learn why low-heat drying methods are best for these types of herbs.
Dried Sage: Proper Storage Methods
Once you have successfully dried your sage, the next step is to ensure it is stored properly. Proper storage methods are crucial to maintaining the flavor and potency of dried sage for an extended period. Here are some essential tips on how to store your dried sage effectively:
Remove Sage Leaves from Stems
Before storing the dried sage, it’s important to remove the leaves from their stems. Gently rub the stems between your fingers over a clean surface to remove them. This process allows the leaves to separate easily, ensuring that you only store the fragrant leaves without any woody stems.
Use Airtight Containers for Sage Storage
Transfer the separated leaves into a suitable airtight container. Glass jars or resealable bags work well, preventing air and moisture from entering which can lead to loss of flavor and potency.
Ideal Storage Conditions for Sage
For long-lasting freshness, it is crucial to store dried sage in a cool and dark place. Exposure to heat and light can cause its flavor and aromatic properties to deteriorate quickly. Find a spot away from direct sunlight or heat sources like stoves or ovens.
Freezing Sage for Extended Shelf Life
If you want your dried sage to last even longer, freezing it using vacuum-sealed bags is an excellent option. Vacuum sealing removes all air from the bag, preventing freezer burn and oxidation that could affect its quality over time. Place small portions of dried sage in individual vacuum-sealed bags before freezing them.
Remember that proper drying techniques are equally important as they lay the foundation for successful storage. Be sure to dry your sage thoroughly before storing it using any of the methods mentioned above.
Conclusion: Art of Sage Harvesting & Preservation
Harvesting and preserving sage requires knowing the right techniques. By harvesting before flowering, removing damaged leaves, and avoiding overharvesting, you can ensure the plant’s health. Proper storage methods like refrigeration, oil coating, freezing, and creating sage salts or oils help preserve its freshness and flavor. Drying sage through air drying or using a food dehydrator provides long-term availability. Follow these guidelines to enjoy the vibrant flavors of sage in your culinary endeavors throughout the year.

Frequently Asked Questions (FAQs)
How long does fresh sage last in the refrigerator?
When stored correctly in the refrigerator, fresh sage can last several weeks. To keep sage fresh for several days, refrigerate wrapped in paper towels. For longer storage, coat leaves in olive oil and refrigerate in an airtight container for up to 3 weeks.
Can I use dried sage instead of fresh sage in recipes?
Dried sage is a great substitute for fresh sage and can be used in equal amounts. Just remember that dried sage has a more concentrated flavor, so adjust accordingly.
Is it better to dry or freeze sage?
Drying sage is a preferred method for preserving sage as it intensifies its flavor and aroma, making it ideal for recipes that require a strong taste. Freezing sage is an acceptable method for preservation, but it should be noted that the flavor may fade compared to dried sage.
What is the best type of sage to cook with?
Common sage and Greek sage are popular sage varieties that are grown for cooking, but there are several other culinary varieties that can be grown depending on where you live. See our guide on the 6 Best Culinary Varieties of Sage to grow in your garden.
How long do you hang sage to dry?
To air dry sage, tie stems into small bundles and hang upside down in a cool, well-ventilated area away from direct sunlight for about two weeks until brittle.
Can I grow my own sage at home?
Sage is an easy herb to grow in your garden or even indoors. It requires well-drained soil and plenty of sunlight.
Last Updated on 21 October 2023 by Bob Lee